Categories
Gardening Tips

How to make a spilling flower display

If there’s one thing that makes a garden more exciting, it’s a centerpiece. A centerpiece, or focal point, is important to have in a garden because it captures the attention of the beholder and makes the surrounding landscape seem more interesting and teeming with life.
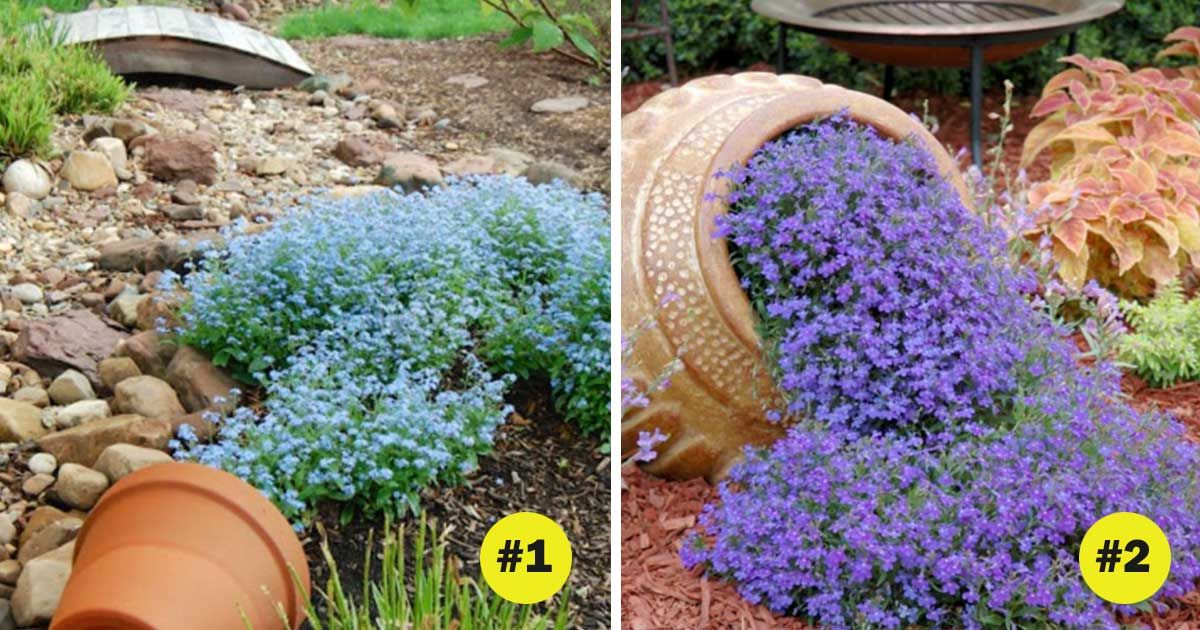
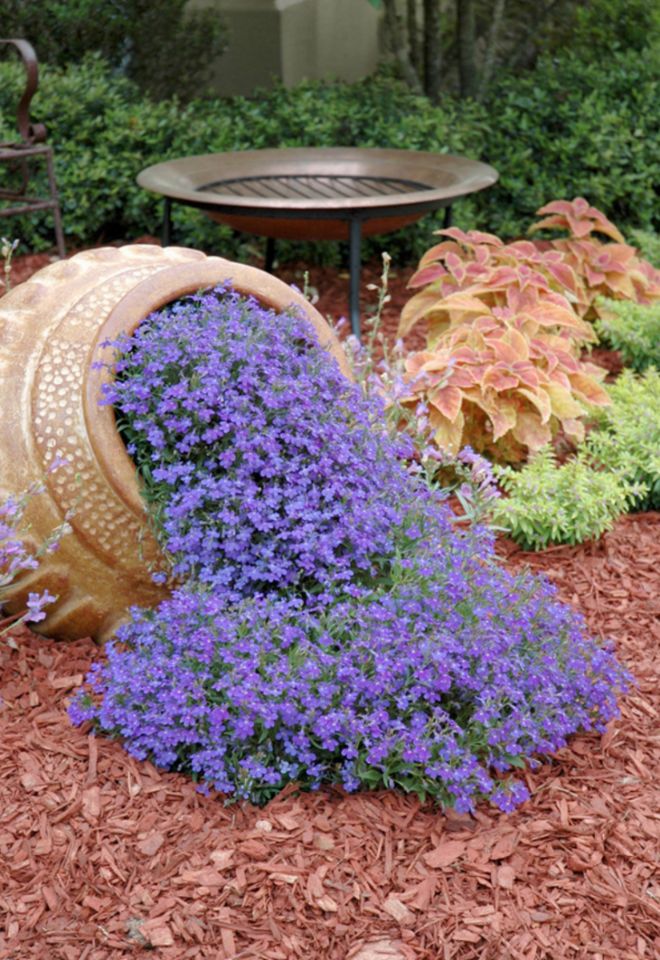
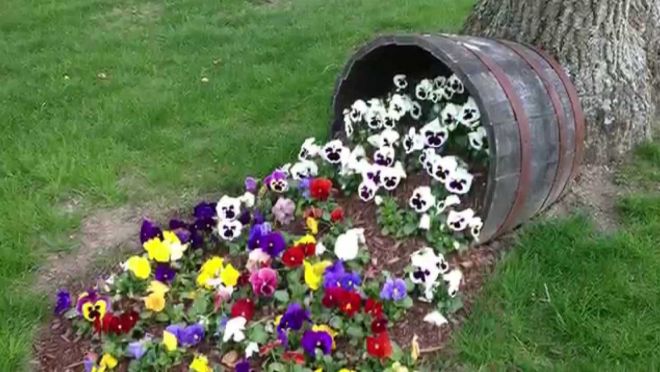
A spilled flower pot is an easy centerpiece idea that you can create today. It adds character to a garden landscape with its waterfall look. To make a spilled flower pot, you will need to first pick the perfect spot in your garden. Once, you’ve selected the perfect place for your spilled flower pot, you will need to gather your materials. You will need flowers, a pot and some soil or compost.
Planting your spilled flower pot
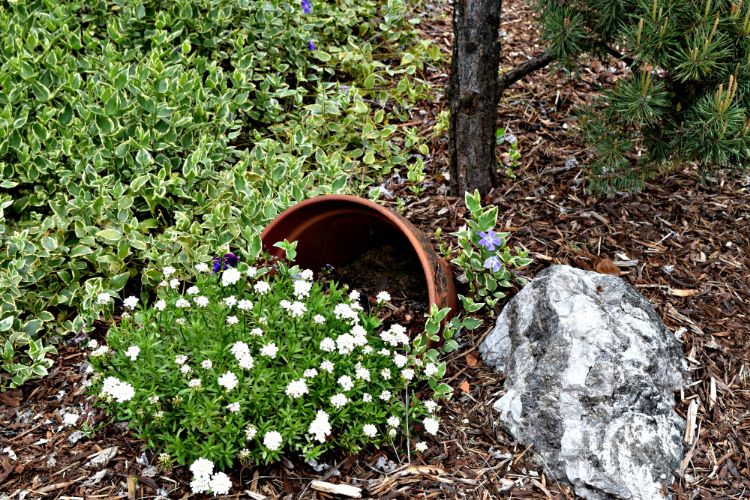
To create your spilled flower pot centerpiece, dig a hole in your desired location. Next, put the flower pot in the hole and fill it in with potting soil and five to six plants.
A great use for a broken pot
According to Balcony Garden Web, a round or circular-shaped pot is perfect for a spilled flower pot. This project is a great way to make use of a broken flower pot.  If you use a broken pot, make sure the broken part is fully covered by the soil.
Warm and cool color flowers work best
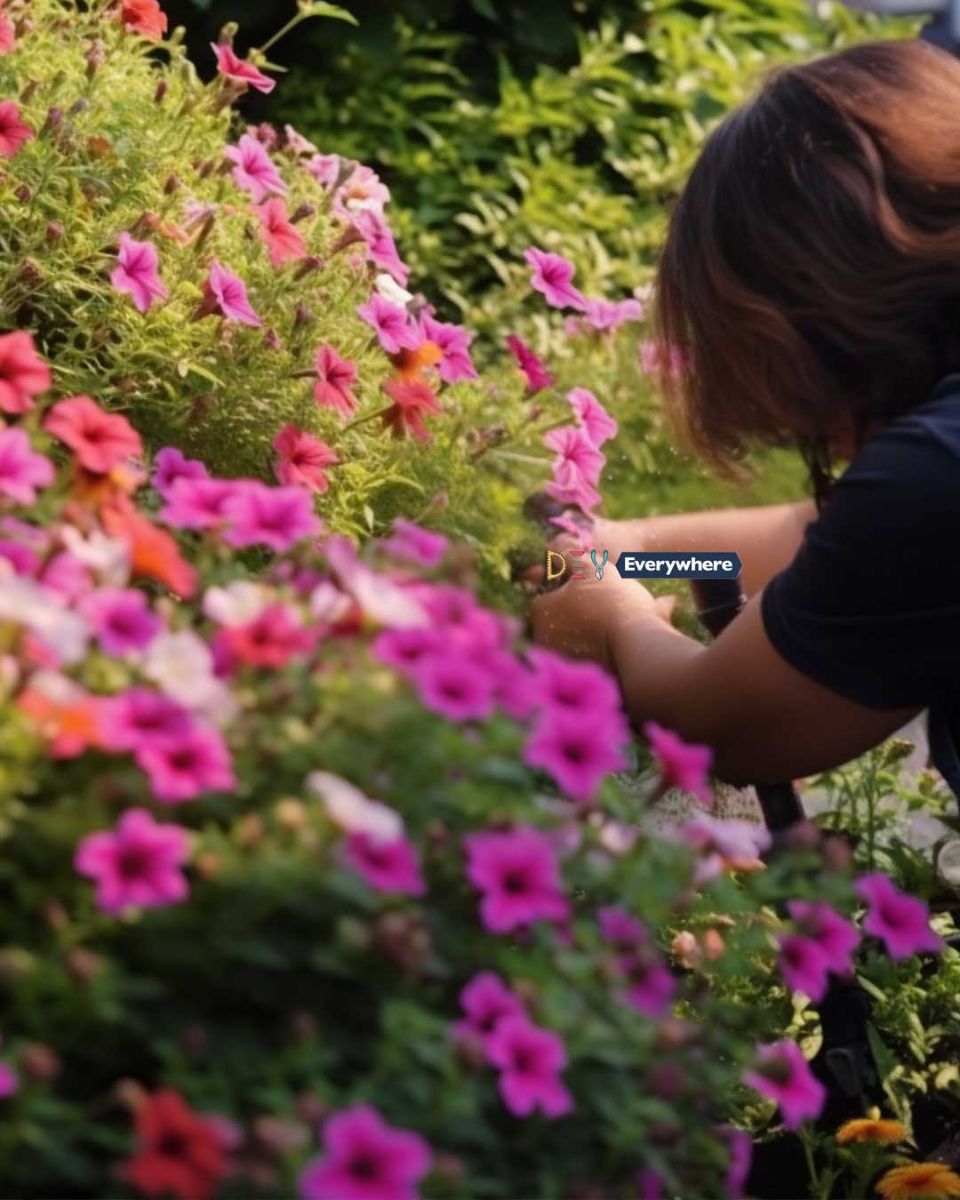
For the flowers, Balcony Garden Web recommends using warm colors like red, yellow, orange as they are attention grabbing colors. As far as specific plant types are concerned, Interiorholic suggests sticking to geraniums, lobelias, petunias, alyssum, daisies, and begonias as they are cascading flowers.
Use up leftover plants
You can go buy flowers specifically for this project or, as Interiorholic recommends, you can use up plants you have left over from other gardening projects. Though Balcony Garden Web recommends using warm colors for the spilled flower pot, cool colors such as blue and purple work equally well. Succulents are also a great choice according to Interiorholic.
How to create the spilling effect
Today’s Homeowner suggests placing a couple of plants inside the rim of the pot, so that the plants appear to be spilling out.
Care for them as with other annuals
According to Today’s Homeowner, you should care for the plants in your spilled flower pot as you would with any other annuals by watering them and using a fertilizer occasionally.
If you love the idea of a spilled puddle of flowers, be sure to SHARE this with your friends!
Categories
Gardening Tips

Plant a plastic water in the ground & get this remarkable effect in your garden

Gardening enthusiasts, sustainability supporters, and DIY project lovers alike, listen up! If you’ve ever faced the problem of keeping your plants watered while on vacation or are simply looking for an efficient way to water them consistently, you’ve stumbled upon a golden solution.
You’ll want to save your plastic bottles for this one. Repurposing a plastic bottle into an automatic vegetable waterer not only conserves water but also makes sure your plants receive the moisture they need at the right time. Let’s dive into why and how this DIY trick works.
Why It Works
Consistent Water Supply:
Plants, especially vegetables, need consistent moisture for optimal growth. An automatic waterer delivers a steady supply of water directly to the roots, ensuring that the plant doesn’t dry out or get waterlogged.
Water Conservation:
Traditional watering methods like sprinklers often lead to a lot of wasted water due to evaporation and runoff. The plastic bottle method targets the root zone, ensuring minimal wastage.
Root Health:
When water is delivered directly to the plant’s root zone, it encourages the roots to grow deeper into the soil, seeking moisture. This strengthens the root system and makes the plant more resilient to drought.
Recycling: This method repurposes plastic bottles, giving them a second life. It reduces the need to purchase special equipment or tools, and it keeps bottles out of landfills.
How It Works
Materials:
Empty plastic bottle (1-2 liters, depending on plant size)
Sharp knife or scissors
Awl or nail (for making small holes)
Water
Optional: A funnel or tube
Steps:
Preparation:
Begin by thoroughly washing the plastic bottle to ensure there are no residues that might harm your plants. Remove any labels.
Bottle Modification:
Using the sharp knife or scissors, cut off the bottom of the bottle. This will be the end that is inserted into the ground.
Hole Creation:
Using an awl or nail, carefully create small holes around the neck and shoulder area of the bottle. These holes will allow water to slowly seep out into the soil. The number and size of the holes will determine the rate at which water seeps out. A good start is 4-6 small holes.
Placement:
Dig a hole next to your vegetable plant, ensuring it’s deep enough for at least ⅔ of the bottle to be buried. The mouth of the bottle (with the holes) should be facing downwards, toward the plant’s roots.
Filling the Bottle:
Fill the bottle with water. If the opening at the top is small, you may find a funnel or tube helpful. Once filled, screw the cap back on. This controls the air flow and thus the rate of water seepage.
Monitor:
For the first few days, monitor the water level in the bottle and the moisture of the soil around the plant. Adjust the number and size of the holes if necessary. If the water is depleting too quickly, you may need fewer or smaller holes. Conversely, if the soil is not moist enough, consider enlarging the holes or adding more.
Refilling:
Simply remove the cap, fill the bottle when needed, and replace the cap. Depending on the plant’s needs and the climate, you may need to refill the bottle every couple of days or once a week.
Planting a plastic bottle in the ground is a simple, eco-friendly, and effective method to keep your vegetable garden well-hydrated. It’s an example of how innovative, sustainable solutions can be found in everyday objects. So, the next time you’re about to toss a plastic bottle into the recycling bin, consider giving it a second life in your garden instead. Your plants will thank you!
Categories
Gardening Tips

Lady wraps twine around a pine cone, creates chic fall decor in no time

People used to decorate with pine cones in the fall and winter and forget about them during the warmer months of the year. However, there’s a recent trend toward springtime pine cone decorations. This garland will work in any season, and, in fact, you might find you want to keep it up in your home all year.
The combination of the natural pine cones with the dried citrus definitely makes this a sensible addition to your kitchen, but don’t limit yourself. Hang it over any windowsill, across your bed’s headboard or even on the edge of a mantle. It will add scent, texture and visual appeal to any of these spaces.
Materials
– Red and white baker’s twine, about 60 inches long
– Measuring tape
– Scissors
– 5 medium-sized pine cones
– 6 slices of dried oranges
Instructions
1. Cut a length of red and white baker’s twine a bit longer than the space you’d like to span with the finished project. About 60 inches is good to aim for, but measure the length of the space where you will hang it and cut the piece accordingly. The final length will be shorter because you’ll create knots in the twine as you add elements to the project.
2. Lay out the pine cones and dried oranges in the order in which you plan to string them on the garland. One option is one pine cone, one orange slice, two pine cones, two orange slices, one pine cone, two orange slices, two pine cones, and one orange slice.
3. Work from left to right, attaching the pieces to the baker’s twine. Attach the pine cones by wrapping the twine around the center of the pine cone and securing it with a knot. Attach the orange slices by sliding them onto the twine by their open centers and securing them with a knot.
4. Evenly space each item out across the twine.
5. Hang the garland, and enjoy it all season long.
Categories
Gardening Tips

You are doing it all wrong. Here’s the right way to trim annuals

Annual plants undergo a remarkable journey within a single growing season, progressing from seed germination to their ultimate demise. Although some gardeners may find the annual cycle of planting and replanting each spring a bit demanding, there are numerous advantages to incorporating annuals into your landscape. These include a wider spectrum of vibrant colors, cost-effectiveness compared to perennial plants, the convenience of not having to divide plants over time, and the ability to easily swap them out for different varieties.
Despite their relatively short life spans, annuals can maintain a consistent display of beautiful blossoms throughout much of their existence if properly tended to. Here are some detailed tips to help you achieve this:
Deadhead Spent Flowers:
Removing fading or spent flowers serves a critical purpose. Plants invest energy in producing blooms, and when these flowers start to decline, the plant shifts its focus to seed production. By consistently deadheading, you redirect the plant’s energy towards generating new blossoms instead of seeds, resulting in a prolonged and more abundant flowering period.
Pinch Back Leggy Plants:
When annual plants grow excessively tall and thin, it is primarily due to a phenomenon known as etiolation. This happens when the plant stretches for light. By pinching back the top portions of leggy plants, you encourage them to allocate resources towards lateral growth. This lateral growth creates a denser, more attractive appearance and ensures that the plant remains sturdy and less prone to toppling over.
Trim Lateral Buds off Stems:
In cases where you desire a single, large flower on a stem, it’s crucial to remove lateral buds. These buds compete for nutrients and can result in smaller, less impressive blooms. By eliminating these lateral buds, you concentrate the plant’s resources on nurturing one dominant flower, leading to a more striking and substantial blossom.
Remove Terminal Buds:
Removing the terminal bud, which is the bud at the very tip of a stem, has a fascinating effect. When the terminal bud is taken off, the plant responds by channeling energy into the growth of lateral buds below it. This creates multiple smaller buds along the stem, ultimately producing a profusion of blooms, adding vibrant color and visual interest to your garden.
Discard Diseased Tissue:
Plant diseases and fungal issues can spread rapidly if not addressed promptly. Removing infected or diseased tissue is vital to prevent the ailment from spreading to healthy parts of the plant or to neighboring plants. This practice not only safeguards the affected plant but also helps maintain the overall health of your garden.
Use Clean, Sharp Equipment:
Clean, well-maintained gardening tools are essential for two critical reasons. First, clean tools prevent the inadvertent transfer of diseases from one plant to another. Pathogens can cling to dirty equipment, and using contaminated tools can inadvertently spread diseases throughout your garden. Second, sharp tools make clean, precise cuts during pruning. This minimizes damage to plant tissue, reduces stress on the plant, and accelerates the healing process, ultimately leading to healthier and more vigorous growth.
Categories
Gardening Tips

Stop buying blueberries. Use these clever methods to get a never-ending supply

Having a steady supply of blueberries on hand is a great way to add a little sweetness (and some vitamins and minerals) to your breakfast or favorite smoothie. Blueberries are also a tasty snack all on their own. Unfortunately, blueberries can be a bit expensive.
But if you grow your own blueberries at home, you can skip the inflated prices and enjoy fresh fruit from your own garden.
Check out the following tips for growing your own blueberries:
1. Picky, picky, picky:
Before planting your blueberry bush, do a little research and make sure you snag a bush that will grow best in your climate. Some berries do better in humid climates, while other varieties do just fine in freezing temperature.
2. Consider the soil:
Acidity matters. You will need a soil pH of between 4 and 5. If your soil and/or weather conditions aren’t ideal for berry growing, you can plant them in pots.
3. Plant them right:
Your berries need plenty of sunlight and good soil. If you are planting them in the ground, choose a spot that gets a lot of sunlight. Leave at least 5 feet between each bush. If you opt for pot-planting, choose an 18-inch pot. Give them about 1 to 2 inches of water per week.
4. Keep them safe:
Protect your plant from bugs, birds and other hungry creatures by framing it with bamboo sticks and covering with a food-grade net.
5. Keep ’em coming:
Blueberry bushes can produce fruit for up to 20 years. To ensure longevity, prune your bushes every few years. Because pruned bushes won’t produce the year they are pruned, you may want to have more than one bush and alternate pruning seasons.
6. Get the best:
Buds typically appear in the early spring, and berries are usually ready to pick by July. After they turn blue, wait a few days. Ripe berries will fall off the bush into your hands.
Growing blueberries is a great way to create your own patio or balcony garden if you live in a small place. If you know friends who’d love to have their own supply of blueberries, share these tips with them on Facebook.
Categories
Gardening Tips

12 gorgeous Christmas crafts you can make with a mason jar

As the holiday season approaches, there’s a certain charm in adding a touch of DIY magic to your home decor. Mason jars, with their rustic appeal and versatile nature, make for the perfect canvas to create stunning Christmas crafts. Whether you’re looking to adorn your holiday table, give thoughtful handmade gifts, or simply infuse your living space with festive cheer, we’ve gathered a delightful collection ofgorgeous Christmas crafts that can be crafted using mason jars.
From twinkling lanterns to whimsical snow globes, these crafts are not only a joy to create but will also fill your home with the warmth and beauty of the holiday season. So, roll up your sleeves and get ready to embark on a creative journey that will make your Christmas celebrations truly special.
1. Christmas luminaries
This DIY luminary gives the “wow” factor to your home. Feel free to personalize the sparkling creation to your own taste and style. String lights are used to light it up, and you can create any scene you want! Arrange completed luminaries on an end table or as a centerpiece and in no time at all, your home will be lit up and shining for the season.
2. Christmas snow globes
A simple mason jar, a little water and glitter go a long way when combined with a tiny tree-land design. It doesn’t take much to transform a sealed mason jar into a small wonderland of glittering snowfall. Easy to make and fun to shake, a Christmas mason jar snow globe will give your spirit a holiday lift with every upside-down turn. Get the full tutorial here.
3. Christmas jute mason jar
Place finished jars onto a table as part of a centerpiece or fill them with small ornaments, twinkle lights or pine cones and line them up on a mantel. You don’t have to know how to crochet or knit for this simple jute DIY project. Get the full tutorial here.
4. Snowy mason jars (h/t A Pumpkin & A Princess)
Give mason jars a gleaming, snowy look with this DIY project. There are many possibilities to use them from table centerpieces to outdoor decor or gift-giving.
5. Metallic-wire wrapped mason jars (h/t Cherished Bliss)
This mason jar craft adds a touch of plaid and metallic wires. Pair with rustic pine cones and some Christmas floral stems. You’ll have a little mini Christmas tree that you can put on your dining table or fireplace mantel.
6. Holiday candle jars
Candles keep your holiday ambiance cozy and can also be a lovely way to give simple holiday favorites new life. This DIY project takes a tasty turn as you combine peppermint candies with multipurpose mason jars to craft a charming holiday candle. Adding a touch of peppermint oil allows for a delicious scent to accompany the warm glow. Get the full tutorial here.
7. Aqua snowflake mason jars (h/t Ka Styles)
If you are looking for a floral, peaceful design, this DIY is for you! We are obsessed with this mason jar trio! Aside from the mason jar, you’ll need acrylic paint and a snowflake stencil.
8. Christmas sweater jar (h/t It All Started With Paint)
This DIY offers a cute and creative way to gift Christmas treats, such as little candies and cookies. It looks so cute, and it’s easy to make.
10. Soap dispenser (h/t Mad in Crafts)
Guests will delight when using this DIY soap dispenser crafted from a mason jar. They also make adorable hostess gifts. Fill the empty container with candy or holiday-scented soap.
11. Wreath ornaments
Create miniature wreaths using mason jar lids, which are suitable for decorating the Christmas tree or using alongside gift tags this season. Get the full tutorial here.
12. Candy-cane style wreath ornament
If you prefer a candy cane style wreaths instead, check out the full tutorial for the project at Sadie Seasongoods.
Categories
Gardening Tips

How to repair a lawn and get rid of patches and brown spots

There’s nothing quite like enjoying the fruits of your labors. Sitting on your front porch, looking at the beautiful garden you planted and running your toes through the thick green grass in your front yard  is a great way to pass the time… except when your lawn isn’t green.
Brown, dying grass can be frustrating, especially after you’ve put in the work to weed and mow it all year long. Before you can treat your brown grass issues, it’s helpful to know why it looks dead.
According to Garden Counselor there are a few reasons for the off-colored grass:
Type of grass: Grasses like Bermuda grass and St. Augustine, grow better in warmer soil. Warm soil is essential to green up these grasses. It’s not outside temperature, it’s the temperature of the dirt.
But, grasses like fescues, bluegrass and ryegrass do better in spring and fall. They won’t grow at all during the winter but summer heat is even worse on the grass. They need extra water during hot months to keep them cool.
Water: If your grass is brown when it should be green, you may not be adding enough water. Dig up a few areas of grass and check the soil about 4-inches deep. The soil should still be moist. If it’s dry and hard, your grass isn’t getting enough water.
Bugs/Disease:  Disease happens earlier in the season. Bug problems typically occur after the weather has warmed up significantly. While bug damage can resemble disease-related damage, if it occurs later in the spring and summer bugs are probably the culprit. Dig up a patch of grass and look for bugs or worms.
Repairing Damaged Grass
If you’ve identified the problem and made steps to repair it, don’t expect your grass to green up over night. If the problem is bad enough, your grass could be dead and it may take a few weeks to see improvement. This Old House recommends a few steps to speed the process up:
1. Get rid of dead grass from the lawn.
2. Apply fertilizer to your lawn with a broadcast spreader
3. Apply grass seed to your lawn.
4. Use a rake to work seeds into the soil
5. Spread compost over your seeds
6. Mist the area with a hose. Too much water will wash the seeds away. Keep the area moist as the seeds take route.
7. To keep grass healthy, mow your lawn as short as possible at the end of fall. Refrain from fertilizing until the next spring.
Other tips for keeping your lawn green include:
-Remove weeds frequently. Weeds can take over your lawn. Herbicide can help control persistent growth.
-Consider lawn aeration. This will help the roots of your grass get enough oxygen to promote healthy growth. Aeration is also an excellent way to help get rid of diseases that could be ruining your grass, according to House Logic.
-Pay attention to your pets. Animal urine can kill grass fast. Make sure to hose areas that your dog favors to keep the acidity from killing your grass.
You work hard to keep your home and yard tidy. A few extra steps can help ensure your lawn looks beautiful and healthy. Make sure to share these helpful tips with your friends on Facebook and feel free to share your tips in the comments below!
Categories
Gardening Tips

Buy a $1 plate at the discount store and transform it into gorgeous custom dishware

Imagine if you could transfer your creative ideas and doodles onto a permanent surface and continue to enjoy your creations for a long time to come. You can with these tutorials on how to create crafts with Sharpie pens. From dinnerware to planters, the only limits are your imagination.
Here’s a look at some of the most inspiring posts showing how to use Sharpies in a whole new way. You can incorporate your own color scheme and style, and any of these ideas can serve as great gifts this upcoming holiday season.
1. Bright, colorful marker designs on plain bowls
Brit & Co. uses regular permanent marker-style Sharpies in bright, cheery colors to decorate these ceramic bowls and containers. The design here is delightful, but you can use different patterns if you like. The tutorial includes instructions for washing so your creations stay looking bright and new.
2. Custom planters in just two simple steps
These adorable planters from DIY Candy are super-easy to make. This is the same technique used to create ceramic mugs, but instead on a flower pot. You also don’t have to use the typical methods to make the paint permanent because you aren’t going to wash these as frequently as you would projects involving food or drinks. All you need are letter or shape stickers and an oil-based Sharpie.
3. Easy-to-make heart mugs
Brendid made these lovely mugs with a sweet theme. If you’re nervous about making a perfect heart, don’t worry. You actually use the handle of the mug to create the stencil yourself, so the heart forms just right every time. These custom-made mugs are permanent when you use Sharpie oil-based paint pens and follow the instructions to keep everything in place for a long time.
4. A gift for a teacher or just about anyone who likes coffee
Designer Trapped shows us how to create this colorful dotted monogram mug as a one-of-a-kind gift for a teacher or anyone else in your life. The unique design makes this mug stand out. You can even choose different shapes for the center.
5. Rustic chic dinnerware with permanent marker accent
This plate from The Sweetest Occasion was created using regular Sharpie permanent markers and a stencil.
The pattern is simple and sweet — the perfect complement to the rustic wood-slice placeholder under it. No one would think this plate was made using a Sharpie marker!