Do It Yourself Stone Wall Repair
Wondering how to rebuild a stone wall? Get in-depth directions for do it yourself stone wall repair to return your old stone walls to functional, beautiful structures that will last for years to come.

Wondering how to rebuild a stone wall? Get in-depth directions for do it yourself stone wall repair to return your old stone walls to functional, beautiful structures that will last for years to come.
In 1871, a national census of agricultural fences recorded more than 250,000 miles of stone walls in the northeastern United States alone–enough to wrap around the Earth 10 times. Two generations of farm laborers built most of these walls between 1775 and 1825 to keep in livestock and protect property lines, and also as a resourceful way to use a seemingly endless supply of stone that worked its way to the surface year after year.
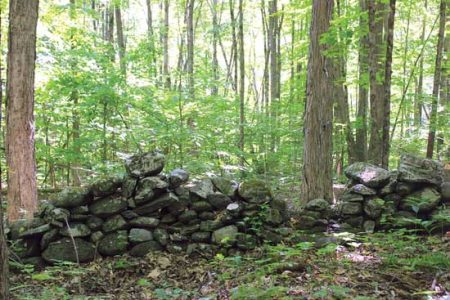
Many of these walls have long since collapsed due to time and neglect. Perhaps you have some on your own property. With a little knowledge and a decent amount of work, you can return them to their former glory.
The following instructions are based on an intensive multi-day workshop I took at The Stone Trust in Vermont. The Trust offers a range of hands-on classes, from introductory to advanced, working with stone. You can find the full schedule at www.TheStoneTrust.org
Preparing the Old Stone Wall
The condition of the wall you’ll be repairing will determine how you start the rebuild.
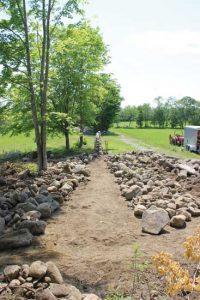
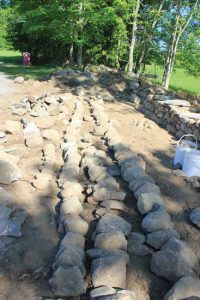
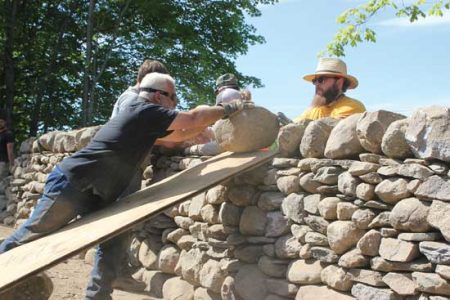
Standing Wall: If you’ll be working on a wall that’s mostly standing, your first step will be to carefully dismantle it in layers from the top down. As you work, sort the stones into lines by size and use, roughly replicating how you’ll restack them in the wall. By sorting the stones as you dismantle the wall, you’ll be better able to see and identify the stones you’ll have to work with, making it easier to find stones when you need them later. You’ll also be able to estimate more accurately whether or not you have enough copestones (large stones placed on top of the wall) and throughstones (long stones that tie the two sides of the wall together). Be sure to maintain 2 feet of clear walkway down the length of the wall to minimize your chances of tripping, and so you can quickly move out of the way if the old wall collapses while you’re dismantling it.
Carefully remove the copestones and place them in a line about 9 feet away, arranging them on edge, roughly how they’ll be placed back on the wall. Next, place the smallest build stones in a line in front of the copestones. Put the next larger course of stone in a line in front of that, and so on. Dismantle both sides of the wall equally, placing the stones on their respective sides of the wall to ensure you have an equal amount of stone on both sides. When you reach the throughstones, set them on the far side of the line of copestones so you don’t accidentally mix them in with the other large building stones. Place the foundation stones closest to the wall, and the hearting material (small filling stones) in piles next to your walkway about every 6 feet. You’ll use hearting throughout the rebuild process, so you’ll want to have it within reach no matter where you are along the wall.
Linear Rock Pile: If you’ll be rebuilding a wall that’s mostly collapsed into what can be described as a linear rock pile, you’ll have a bit more work ahead of you. You’ll need to dig out any buried stones and remove any trees, stumps, and brush. To save time and your back, consider using or hiring an excavator or a tractor equipped with a rock bucket. Once the path of the wall has been excavated and leveled, you’ll sort the stone as described previously.
Creating a Firm Foundation
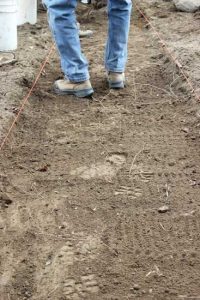
How you prepare the foundation trench largely depends on the condition of the wall you’ll be rebuilding. If you’re working with an existing wall that still has an intact foundation course, leave the foundation trench as intact as possible. The soil beneath the trench will already be well-compacted by the weight of the wall, which will minimize the amount of settling your rebuilt wall will experience. Hammer stakes along either side of the foundation trench, and stretch string lines about an inch above ground level. Using the line as a guide, widen the existing trench by about 3 inches on either side, removing the soil at a right angle (versus a rounded corner). This will make it easier to place the foundation stones.
If you’re rebuilding a wall that has collapsed into a linear pile or has trees growing up through it, you’ll inevitably disturb the original foundation trench as you remove stumps and dig out the original wall stones. If this is the case, you’ll need to outline a new foundation trench with stakes and string lines after you relevel the site. Once the lines are set, dig a level trench about 2 to 6 inches below grade, then tamp the earth firmly. Dig the new trench about 6 inches wider than the width you plan for the base of the wall. If you’re building on clay soil that isn’t level, dig a trench 6 to 18 inches deep, install a 4-inch perforated drainage pipe that exits at a lower grade, and then fill the trench with crushed clean stone, compacting the stone as you fill to reduce settling. If the ground is too level to make this possible (less than 1⁄4-inch drop for every foot), best practice is to simply build on the native soil and forgo the trench because it would tend to hold water.
Build Your Batter Frames
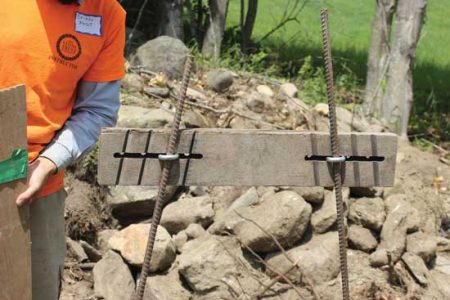
After the foundation trench has been prepared, you’re ready to set up batter frames. These are frames that you can stretch string lines between to define the outline of the wall. Batter frames will help you lay a wall with a smooth face and a consistent batter (inward slope). You can construct a batter frame in various ways. This method utilizes rebar and a movable clamping crosspiece. The materials below will be enough to create and set up one batter frame.
Materials & Tools:
- 48-inch level
- 33-inch 2-by-6
- Duct tape
- Two 24-inch 1-by-2s
- Four 3-inch bolts
- 8 washers
- 4 wing nuts
- Four 6-foot pieces of 5⁄8-inch rebar
- Sturdy string
- 4 rebar safety caps
- Saw
- Drill
- Drill bit
- Hammer
- Create a modified level to measure the batter of your wall. This level will be for a wall with a batter of 1:6. Begin by drawing a line from opposite corners on the 33-inch 2-by-6. Then, use a saw to cut the board along the line. You should end up with two acute triangles with a batter of 1:6. Securely attach one of the triangles (cut side facing out) to the level with duct tape so the point of the triangle is at one end of the level. This modified level will allow you to accurately guide the rebar at the correct batter as it’s hammered into the ground.
- Next, create a clamping crosspiece. Place the 1-by-2 boards on top of one another, and drill four holes big enough for the bolts through both boards: two holes that are 1 inch from either end, and another two that are 7 inches from either end. Put a bolt through each set of holes, placing a washer on each end of the bolt. Tighten the clamp using the wing nuts.
- To set up the batter frames, use the modified level to pound a rebar rod at the correct batter about a foot into the ground at the outside edge of where the foundation will run. Do the same thing across the trench, making sure that the rebar rods are directly across from one another
- Attach the crosspiece at the height and width of the wall just below where the copestones will be placed, making sure that the crosspiece is level.
- Hammer in the other two rebar rods (which will act as prop rods) a couple of feet behind the batter rods so they contact each batter rod just above the crosspiece. Check that the batter frame rods are plumb, and then lash the prop rods to the batter frame. Put safety caps on the exposed ends of the rebar to avoid accidental injuries.
- Attach the string lines to the legs of the batter frame by wrapping the line around a few times and then tying the end of the line around a peg driven into the ground. Make sure the lines are on the inside of the legs so that the stones stay inside the profile of the batter frame as you build.
- There are many advantages to building a wall with batter: It increases stability, making it less likely to topple; it requires smaller copestones; and it vastly reduces the amount of stone needed. If you’re only repairing a section of an otherwise intact wall, you can follow the existing batter. If you’re rebuilding the entire wall, you can define whatever batter you prefer. A typical wall has a batter of 1:6 (the face angles in 1 inch for every 6 inches of height) with proportions of 1 unit for the top, 2 units for the base, and 3 units for the height. For example, a wall that’s 3 feet tall will approximately have a 2-foot-wide base and a 1-foot-wide top. For a wall 48 inches tall, the base would be about 32 inches wide and the top would be about 16 inches wide.
- If you’re tying into an existing wall, you can simply push a rod into the existing wall at the correct level and stretch the line from that to the batter frame. Alternatively, you can set a piece of rebar along the existing wall and tie the line to the rebar. For the foundation course, tie the guideline about 1 inch above the height of your proposed foundation.
Setting Your Foundation Stones
Using the original foundation stones, or the biggest stones except for those that would make good throughstones, begin placing foundation stones into the foundation trench. If you have large, awkward stones, the foundation is often the best place for them because you can sculpt out the trench underneath the stone to accommodate any number of odd shapes. Place stones with their length pointing into the wall, alternating longer stones on each side of the wall rather than grouping them all on one side. Make sure that each stone is resting on a good base and doesn’t wobble. If it does, sculpt out the trench underneath it so the stone is steady and sets well with its neighbor. Lay the stones so they’re level and match the height of their neighbors, which may require you to dig out the trench underneath a taller stone. When you place a stone, try to have it touch its neighbor as much as possible, and when placing foundation stones on the opposite side of the wall, try to find stones that will come as near as possible to touching the opposite stone. Pack hearting into the center of the foundation as you go. Fill in the exposed trench in front of the foundation stones once they’re set.

If you’re working on a slope, set the foundation stones level rather than following the slope, starting a new course if you have to. This will keep the forces in the wall perpendicular to gravity, and it will reduce wall movement and the tendency for foundation stones to slide down the slope.
Hearting a Stone Wall
Hearting is generally made up of smaller stones, but it serves a big role in keeping a stone wall sturdy and upright for the long haul. By packing hearting tightly into the center of the wall, you’ll keep the wall stones from settling inward and secure pinning stones in place so they can’t back out, which would eventually lead to the wall collapsing.

Good hearting should be angular (round river rocks aren’t a good choice), and generally no smaller than 3 inches. Don’t use soil, sand, or fine gravel because it’ll wash out over time or act as ball bearings, allowing the wall stones to shift more easily.
Carefully pack in your hearting up to the same height as your face stones to hold your face stones in place as you work on each layer. Start by packing your hearting underneath and in between neighboring face stones on both sides of the wall, and then work your way in toward the center of the wall where you’ll pack in larger hearting to hold everything tightly in place. Use stones that are as large as possible for each crevice, leaving as little airspace as you can. Your aim is to create a firmly packed filling that will only tighten more over time as the wall settles.
Subsequent Courses
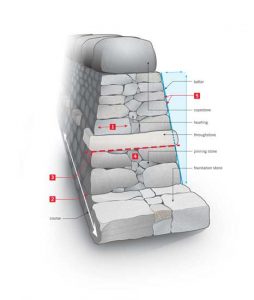
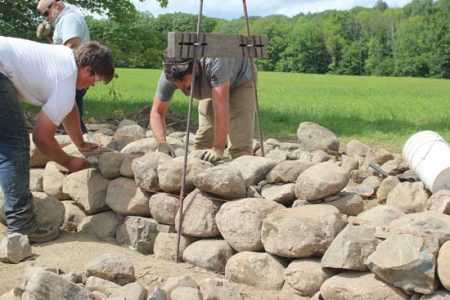
Once you have the first section of foundation stones set and hearted, you’re ready for the next course. Place each course along the length of the wall that you plan to complete over the next day or two, before placing the next course. To ensure that you use consistently smaller stones as you work your way up, always look for the largest stone that you can use for each course. Using larger stones at the bottom and smaller stones at the top (except for the copestones) serves a few purposes: Small stones on top of big stones are less likely to settle than the opposite arrangement; it’s easier and less dangerous to use large stones near the base versus lifting them high onto the wall; and, because you should place stones lengthwise into the wall, the larger stones will need the additional width at the base to fit properly.
After positioning each stone, check that the stone doesn’t wobble. And then mentally run through this checklist of tips:
- Set stones so their lengths go into the wall.
- Cross the joints to achieve a good bond between layers and to distribute the pressure from each stone evenly over the wall.
- Set stones level and at the same height as their neighbor so you can easily build on top of them.
- Pack your hearting stones tightly into the wall, using the largest stones possible and leaving as little airspace as you can.
- Build to the batter line to create a smooth plane.
Strive to accomplish as many of these building principles as possible with every stone you set, and you’ll be well on your way to creating a sturdy stone wall. These tips match up with the numbered labels in the stone wall illustration included in the photo slideshow.
You can use wedges of stone called “pinning stones” when necessary to make the face stone level and steady. Pinning stones should only be placed from the inside of the wall, not pushed into the face where they will fall out over time.
Once the wall reaches a height of 24 to 30 inches, you’ll want to add throughstones. These stones span the entire width of the wall, plus a few extra inches past the batter on both sides, tying the two wall faces together. Using the string lines, build both wall faces level with one another so that the throughstones sit level. Space throughstones at equal intervals along the wall, at no greater distance apart than 3 feet on center. Place the flattest side of the throughstone down, cross the joints of the face stones beneath it, and make sure that it’s resting securely on the hearting and the face stones. After you’ve placed all of the throughstones, set stones between them, fitting the face stones around the throughstones rather than the other way around. Once the course containing the throughstones is complete, you can continue building up the wall as before.
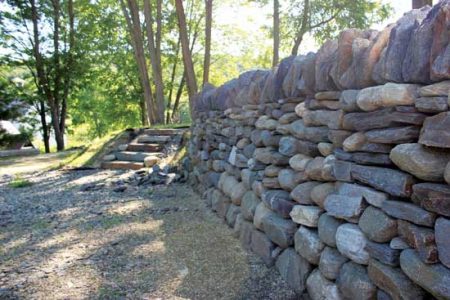
When you’ve built the wall even with the top course of the section of wall you’re tying into, or to your desired height minus the average height of your coping material, you’re ready to add your copestones. Make the final course before the coping as level as possible. The copestones protect the courses and hearting beneath from the weather and animals. These stones also weigh down the lower courses, help bond the two sides of the wall together, and add a good amount of height.
First, you’ll need to set a string line for the copestones. Place a stable copestone of the desired height at the end of the section you wish to cope. Run a line over the top of this stone to the top of the copestones of the wall you’re tying into, or to a copestone at the other end of the section of wall you’re working on (see photo, top right). Starting at the existing copestones (if there are any), begin working your way along the wall. Place these stones vertically on edge, using small wedges to hold them upright if necessary. Because the tops of the copestones define the profile of the wall, getting the stones as close to even as possible with the string line will produce a more aesthetically pleasing wall. Measure the height of the copestones while they’re on the ground if you need to so you don’t lift them unnecessarily. When you’re finished, lock the copestones in place by wedging stones into any gaps.
While every wall is different depending on the available stone, the terrain, the climate, and its intended purpose, utilizing these basic principles should get you well on your way to restoring the stone walls on your property back to their previous beauty and utility.
Russell Mullin was a former editor for Ogden Publications. He has a keen interest in alternative building methods and utilizing local resources to create usable and beautiful structures. He’s currently working to construct a tiny home with his partner, Mary Beth.


- Updated on Jul 22, 2023
- •
- Originally Published on Dec 4, 2018
Tagged with: foundation, rocks, throughstones, wall


Wondering how to rebuild a stone wall? Get in-depth directions for do it yourself stone wall repair to return your old stone walls to functional, beautiful structures that will last for years to come.
In 1871, a national census of agricultural fences recorded more than 250,000 miles of stone walls in the northeastern United States alone–enough to wrap around the Earth 10 times. Two generations of farm laborers built most of these walls between 1775 and 1825 to keep in livestock and protect property lines, and also as a resourceful way to use a seemingly endless supply of stone that worked its way to the surface year after year.
Many of these walls have long since collapsed due to time and neglect. Perhaps you have some on your own property. With a little knowledge and a decent amount of work, you can return them to their former glory.
The following instructions are based on an intensive multi-day workshop I took at The Stone Trust in Vermont. The Trust offers a range of hands-on classes, from introductory to advanced, working with stone. You can find the full schedule at www.TheStoneTrust.org
Preparing the Old Stone Wall
The condition of the wall you’ll be repairing will determine how you start the rebuild.
Standing Wall: If you’ll be working on a wall that’s mostly standing, your first step will be to carefully dismantle it in layers from the top down. As you work, sort the stones into lines by size and use, roughly replicating how you’ll restack them in the wall. By sorting the stones as you dismantle the wall, you’ll be better able to see and identify the stones you’ll have to work with, making it easier to find stones when you need them later. You’ll also be able to estimate more accurately whether or not you have enough copestones (large stones placed on top of the wall) and throughstones (long stones that tie the two sides of the wall together). Be sure to maintain 2 feet of clear walkway down the length of the wall to minimize your chances of tripping, and so you can quickly move out of the way if the old wall collapses while you’re dismantling it.
Carefully remove the copestones and place them in a line about 9 feet away, arranging them on edge, roughly how they’ll be placed back on the wall. Next, place the smallest build stones in a line in front of the copestones. Put the next larger course of stone in a line in front of that, and so on. Dismantle both sides of the wall equally, placing the stones on their respective sides of the wall to ensure you have an equal amount of stone on both sides. When you reach the throughstones, set them on the far side of the line of copestones so you don’t accidentally mix them in with the other large building stones. Place the foundation stones closest to the wall, and the hearting material (small filling stones) in piles next to your walkway about every 6 feet. You’ll use hearting throughout the rebuild process, so you’ll want to have it within reach no matter where you are along the wall.
Linear Rock Pile: If you’ll be rebuilding a wall that’s mostly collapsed into what can be described as a linear rock pile, you’ll have a bit more work ahead of you. You’ll need to dig out any buried stones and remove any trees, stumps, and brush. To save time and your back, consider using or hiring an excavator or a tractor equipped with a rock bucket. Once the path of the wall has been excavated and leveled, you’ll sort the stone as described previously.
Creating a Firm Foundation
How you prepare the foundation trench largely depends on the condition of the wall you’ll be rebuilding. If you’re working with an existing wall that still has an intact foundation course, leave the foundation trench as intact as possible. The soil beneath the trench will already be well-compacted by the weight of the wall, which will minimize the amount of settling your rebuilt wall will experience. Hammer stakes along either side of the foundation trench, and stretch string lines about an inch above ground level. Using the line as a guide, widen the existing trench by about 3 inches on either side, removing the soil at a right angle (versus a rounded corner). This will make it easier to place the foundation stones.
If you’re rebuilding a wall that has collapsed into a linear pile or has trees growing up through it, you’ll inevitably disturb the original foundation trench as you remove stumps and dig out the original wall stones. If this is the case, you’ll need to outline a new foundation trench with stakes and string lines after you relevel the site. Once the lines are set, dig a level trench about 2 to 6 inches below grade, then tamp the earth firmly. Dig the new trench about 6 inches wider than the width you plan for the base of the wall. If you’re building on clay soil that isn’t level, dig a trench 6 to 18 inches deep, install a 4-inch perforated drainage pipe that exits at a lower grade, and then fill the trench with crushed clean stone, compacting the stone as you fill to reduce settling. If the ground is too level to make this possible (less than 1⁄4-inch drop for every foot), best practice is to simply build on the native soil and forgo the trench because it would tend to hold water.
Build Your Batter Frames
After the foundation trench has been prepared, you’re ready to set up batter frames. These are frames that you can stretch string lines between to define the outline of the wall. Batter frames will help you lay a wall with a smooth face and a consistent batter (inward slope). You can construct a batter frame in various ways. This method utilizes rebar and a movable clamping crosspiece. The materials below will be enough to create and set up one batter frame.
Materials & Tools:
- 48-inch level
- 33-inch 2-by-6
- Duct tape
- Two 24-inch 1-by-2s
- Four 3-inch bolts
- 8 washers
- 4 wing nuts
- Four 6-foot pieces of 5⁄8-inch rebar
- Sturdy string
- 4 rebar safety caps
- Saw
- Drill
- Drill bit
- Hammer
- Create a modified level to measure the batter of your wall. This level will be for a wall with a batter of 1:6. Begin by drawing a line from opposite corners on the 33-inch 2-by-6. Then, use a saw to cut the board along the line. You should end up with two acute triangles with a batter of 1:6. Securely attach one of the triangles (cut side facing out) to the level with duct tape so the point of the triangle is at one end of the level. This modified level will allow you to accurately guide the rebar at the correct batter as it’s hammered into the ground.
- Next, create a clamping crosspiece. Place the 1-by-2 boards on top of one another, and drill four holes big enough for the bolts through both boards: two holes that are 1 inch from either end, and another two that are 7 inches from either end. Put a bolt through each set of holes, placing a washer on each end of the bolt. Tighten the clamp using the wing nuts.
- To set up the batter frames, use the modified level to pound a rebar rod at the correct batter about a foot into the ground at the outside edge of where the foundation will run. Do the same thing across the trench, making sure that the rebar rods are directly across from one another
- Attach the crosspiece at the height and width of the wall just below where the copestones will be placed, making sure that the crosspiece is level.
- Hammer in the other two rebar rods (which will act as prop rods) a couple of feet behind the batter rods so they contact each batter rod just above the crosspiece. Check that the batter frame rods are plumb, and then lash the prop rods to the batter frame. Put safety caps on the exposed ends of the rebar to avoid accidental injuries.
- Attach the string lines to the legs of the batter frame by wrapping the line around a few times and then tying the end of the line around a peg driven into the ground. Make sure the lines are on the inside of the legs so that the stones stay inside the profile of the batter frame as you build.
- There are many advantages to building a wall with batter: It increases stability, making it less likely to topple; it requires smaller copestones; and it vastly reduces the amount of stone needed. If you’re only repairing a section of an otherwise intact wall, you can follow the existing batter. If you’re rebuilding the entire wall, you can define whatever batter you prefer. A typical wall has a batter of 1:6 (the face angles in 1 inch for every 6 inches of height) with proportions of 1 unit for the top, 2 units for the base, and 3 units for the height. For example, a wall that’s 3 feet tall will approximately have a 2-foot-wide base and a 1-foot-wide top. For a wall 48 inches tall, the base would be about 32 inches wide and the top would be about 16 inches wide.
- If you’re tying into an existing wall, you can simply push a rod into the existing wall at the correct level and stretch the line from that to the batter frame. Alternatively, you can set a piece of rebar along the existing wall and tie the line to the rebar. For the foundation course, tie the guideline about 1 inch above the height of your proposed foundation.
Setting Your Foundation Stones
Using the original foundation stones, or the biggest stones except for those that would make good throughstones, begin placing foundation stones into the foundation trench. If you have large, awkward stones, the foundation is often the best place for them because you can sculpt out the trench underneath the stone to accommodate any number of odd shapes. Place stones with their length pointing into the wall, alternating longer stones on each side of the wall rather than grouping them all on one side. Make sure that each stone is resting on a good base and doesn’t wobble. If it does, sculpt out the trench underneath it so the stone is steady and sets well with its neighbor. Lay the stones so they’re level and match the height of their neighbors, which may require you to dig out the trench underneath a taller stone. When you place a stone, try to have it touch its neighbor as much as possible, and when placing foundation stones on the opposite side of the wall, try to find stones that will come as near as possible to touching the opposite stone. Pack hearting into the center of the foundation as you go. Fill in the exposed trench in front of the foundation stones once they’re set.
If you’re working on a slope, set the foundation stones level rather than following the slope, starting a new course if you have to. This will keep the forces in the wall perpendicular to gravity, and it will reduce wall movement and the tendency for foundation stones to slide down the slope.
Hearting a Stone Wall
Hearting is generally made up of smaller stones, but it serves a big role in keeping a stone wall sturdy and upright for the long haul. By packing hearting tightly into the center of the wall, you’ll keep the wall stones from settling inward and secure pinning stones in place so they can’t back out, which would eventually lead to the wall collapsing.
Good hearting should be angular (round river rocks aren’t a good choice), and generally no smaller than 3 inches. Don’t use soil, sand, or fine gravel because it’ll wash out over time or act as ball bearings, allowing the wall stones to shift more easily.
Carefully pack in your hearting up to the same height as your face stones to hold your face stones in place as you work on each layer. Start by packing your hearting underneath and in between neighboring face stones on both sides of the wall, and then work your way in toward the center of the wall where you’ll pack in larger hearting to hold everything tightly in place. Use stones that are as large as possible for each crevice, leaving as little airspace as you can. Your aim is to create a firmly packed filling that will only tighten more over time as the wall settles.
Subsequent Courses
Once you have the first section of foundation stones set and hearted, you’re ready for the next course. Place each course along the length of the wall that you plan to complete over the next day or two, before placing the next course. To ensure that you use consistently smaller stones as you work your way up, always look for the largest stone that you can use for each course. Using larger stones at the bottom and smaller stones at the top (except for the copestones) serves a few purposes: Small stones on top of big stones are less likely to settle than the opposite arrangement; it’s easier and less dangerous to use large stones near the base versus lifting them high onto the wall; and, because you should place stones lengthwise into the wall, the larger stones will need the additional width at the base to fit properly.
After positioning each stone, check that the stone doesn’t wobble. And then mentally run through this checklist of tips:
- Set stones so their lengths go into the wall.
- Cross the joints to achieve a good bond between layers and to distribute the pressure from each stone evenly over the wall.
- Set stones level and at the same height as their neighbor so you can easily build on top of them.
- Pack your hearting stones tightly into the wall, using the largest stones possible and leaving as little airspace as you can.
- Build to the batter line to create a smooth plane.
Strive to accomplish as many of these building principles as possible with every stone you set, and you’ll be well on your way to creating a sturdy stone wall. These tips match up with the numbered labels in the stone wall illustration included in the photo slideshow.
You can use wedges of stone called “pinning stones” when necessary to make the face stone level and steady. Pinning stones should only be placed from the inside of the wall, not pushed into the face where they will fall out over time.
Once the wall reaches a height of 24 to 30 inches, you’ll want to add throughstones. These stones span the entire width of the wall, plus a few extra inches past the batter on both sides, tying the two wall faces together. Using the string lines, build both wall faces level with one another so that the throughstones sit level. Space throughstones at equal intervals along the wall, at no greater distance apart than 3 feet on center. Place the flattest side of the throughstone down, cross the joints of the face stones beneath it, and make sure that it’s resting securely on the hearting and the face stones. After you’ve placed all of the throughstones, set stones between them, fitting the face stones around the throughstones rather than the other way around. Once the course containing the throughstones is complete, you can continue building up the wall as before.
When you’ve built the wall even with the top course of the section of wall you’re tying into, or to your desired height minus the average height of your coping material, you’re ready to add your copestones. Make the final course before the coping as level as possible. The copestones protect the courses and hearting beneath from the weather and animals. These stones also weigh down the lower courses, help bond the two sides of the wall together, and add a good amount of height.
First, you’ll need to set a string line for the copestones. Place a stable copestone of the desired height at the end of the section you wish to cope. Run a line over the top of this stone to the top of the copestones of the wall you’re tying into, or to a copestone at the other end of the section of wall you’re working on (see photo, top right). Starting at the existing copestones (if there are any), begin working your way along the wall. Place these stones vertically on edge, using small wedges to hold them upright if necessary. Because the tops of the copestones define the profile of the wall, getting the stones as close to even as possible with the string line will produce a more aesthetically pleasing wall. Measure the height of the copestones while they’re on the ground if you need to so you don’t lift them unnecessarily. When you’re finished, lock the copestones in place by wedging stones into any gaps.
While every wall is different depending on the available stone, the terrain, the climate, and its intended purpose, utilizing these basic principles should get you well on your way to restoring the stone walls on your property back to their previous beauty and utility.
Russell Mullin was a former editor for Ogden Publications. He has a keen interest in alternative building methods and utilizing local resources to create usable and beautiful structures. He’s currently working to construct a tiny home with his partner, Mary Beth.


 Quick fact


 Did you know?


 Trivia


 The excitement and emotion of reuniting with a loved one after a long absence can lead to mistakes, as seen in the case of the woman who mistook Domingo for her son. Fortunately, everything ended well with apologies and laughter.
 It’s a humorous story to tell and share with others, highlighting how reunions can be full of emotions and sometimes a bit chaotic.